This kit for this review came directly to me from the great crew over at Smoant. While they don’t sell direct, they did recommend that it could be purchased from one of their authorized retailers currently selling for (at the time of this writing) $51.99 here.
[button color=”red” size=”big” link=”/likes/101knightv1″ ]Buy Now![/button]
In The Box
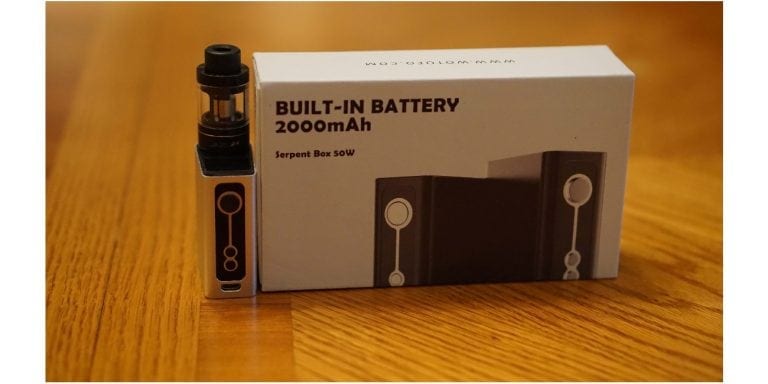
This is a starter kit that comes packaged in a nice 2 piece “Gift” box, and as such includes the Smoant Knight V1 mod, as well as the Talos V1 tank. It is not a complete kit, as there is no battery, or juice included, but it is a fairly comprehensive kit. Included you will get the mod, the tank, a .5 stainless steel 316L coil, an RBA adapter, clapton wire, spare seals, and some organic cotton wicking.

Initial Impressions

Opening the box I was greeted by the Knight mod nestled protectively in it’s foam cradle. Picking it up was the biggest surprise of all though, the mod is exceptionally heavy for it’s compact size. Despite the weight, it is sleek and easily pocket sized with the side by side design. Already pre-mounted in the Knight is the included Talos tank. Unlike the Knight, it’s size belies it’s weight, although in the opposite direction. The tank feels cheap, lightweight, and insubstantial compared to the mod. The tank is color matched in the same white as the Knight, and together they look superb. Do they perform as well as they look? Read on to find out.
So far, I have been describing the contents of the kit as a whole. For the remainder of this review I will be looking at the Smoant Knight v1 and the Talon tank as separate components, almost as if they were two individual reviews, however I will bring them back together for the conclusion.
[button color=”red” size=”big” link=”/likes/101knightv1″ ]Buy Now![/button]
Smoant Knight V1
In this portion of the review I will be focused on the Knight V1 mod.

Specifications
- Side by Side Stealth vaping mod
- 1-60W output power
- 0.5-7.0V output voltage
- Take one 18650 battery
- Can access to adjust Tank airflow control ring conveniently
- Can hold the max 23mm diameters Tank/RBA/RTA
- Temperature control modes support Nickel/Titanium/SS
- Spring loaded 510 pins and SS connector
- Pass-through available
- Side Screen display
- Support Atomizer resistance low to 0.1ohm
- Low Resistance Protection
- Over-time Protection
- Reverse Polarity Protection
- Overheating Protection
Fit and Finish
The Knight V1 takes some obvious inspiration from the Mini Ecigs XVOStick, but it is clearly not a clone of the device. It looks more like a combination of the XVOStick, and the Continental Black Oak mods, with some of the styling touches of the Yihi SX Mini. Overall, it takes many of the best design elements of them all, combined into a very small form factor, suitable for pocket carry. I have to say that it is downright sexy in my humble opinion. I was not sure what I would think about the color, but overall, I really like the white.

The white is not a traditional flat or glossy white, rather it is a sort of opalescent shimmery pearl white and just exudes quality. The finish on mine seems to be very durable, I’m pretty hard on my gear, and after a couple weeks usage, there are only two tiny “nicks” on the bottom and some very light scratching on the right side, all of which were caused by my own stupidity and are NOT a mark against Smoant’s quality finish. As a nice touch, Smoant even included a domed white rubber cap to cover the battery cap, and keep with the color scheme.
The body of the Smoant Knight V1 seems to be made of a single piece of material (I believe it is zinc alloy), with the controls, display, 510 connector and USB port all mounted into it. The only visible seams are around the battery tube and the control panel where the buttons are mounted. The battery tube is integral to the mod, and the stainless screw on battery cap looks good, and is well ventilated in the event of a battery failure. To keep with the aesthetics of the mod, there is a form fitted, domed white cap to cover the battery cap. Keep this point in mind, I’m going to discuss it further below.
The buttons in the control panel, which is inset on the front of the mod, appear to be stainless steel. The are nicely tapered and shaped to have a quality feel to them. The buttons are clicky and responsive, providing good tactile feedback. The only real issue with the buttons is the button rattle, which is just maddening since it is only the fire button that rattles. I wish they had mounted it like the up and down adjustment buttons, as those don’t rattle at all.

The 510 connector is stainless steel with a spring loaded center pin. It is a little different than most other mods, as it has an allen head screw inset into the face of it. This screw actually serves an important purpose that we will discuss below in the usage of the mod. Otherwise, it has 4 air channels for bottom airflow tanks and it looks to be well made. Directly above the 510 connector is a tank guard, integrated into the design of the mod, much like the Continental Black Oak mod.
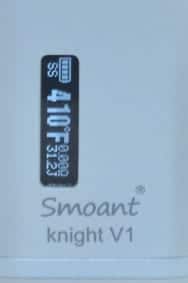
This Smoant Knight V1 was clearly designed to be a small mod, and as such I wouldn’t expect it to have a large display. The review sample I received has a very small 2 line display, but it is functional and shows you all the relevant information you need to vape. The one I received has the display mounted a little crooked, and I don’t know if that is consistent with every one of these or just mine, but either way it really speaks to Smoant’s quality control processes. When a review sample is sent direct from the manufacturer, I wouldn’t expect to find a single flaw, yet somehow it was overlooked.
[button color=”red” size=”big” link=”/likes/101knightv1″ ]Buy Now![/button]
Usage
It is a little counter intuitive to install a battery in this mod, make sure you pay careful attention to which way you put the battery in. Unlike most single battery mods, this one goes in upside down, so that the positive end is at the bottom, and the negative end is at the top. The positive “pin” is NOT spring loaded, so be cautious not to over tighten the battery cap, otherwise you may end up damaging or destroying your battery. Just make sure you tighten it down until it is snug, then stop. Now lets go back to the well ventilated battery cap, once the domed rubber cover is installed, all battery ventilation is plugged. What happens if your battery vents because you tightened the cap down too tight, or worse yet over powered it with a bad coil build?
In the best case scenario, the rubber cap will pop off with great force, and become a dangerous projectile. If that doesn’t happen, then it’s possible that the explosive force of the battery will turn the mod into shrapnel as the mod deconstructs itself in your hand. To avoid this, you could use the mod without the cap, which will affect the way it looks, but may be safer to a degree. In the case of a bad build that overpowers the battery, it is very likely that you will be vaping when the battery vents, and all of that explosive force will vent directly into your face. depending on how you are holding the mod, it could vent into your cheek, or directly into your eyes. Either way, there is a potential for serious injury.

Once you have properly installed the battery and screwed in the cap (remember, only until it is snug), then you need to install your tank and “set” the resistance of your coil. To do this, hold down the up and down buttons until it senses the coil, which will then lock in the proper resistance.
The menu is pretty simplistic, hit the fire button three times and it will take you to the mode selection where you can choose between Variable Wattage, Variable Voltage, Nickel Temperature Control, Titanium Temperature Control and Stainless Steel 316L Temperature Control. Unfortunately there are no custom TCR settings, so if you use any coil material other than NI, TI, or SS-316L, then you will probably have to use VW or VV modes with it.
Temperature Control
In the TC modes, when you lock in your resistance, this will also set the “Joules” to 60 automatically. You can leave it here if you like, temperature sensing should limit it only to what is necessary to get to your preferred temperature. Personally, I prefer to set mine lower, so to change it hold down the fire button and the plus button at the same time until the display changes from temperature to joules. Once in joules, use the up and down buttons to cycle to the setting you want, I usually go for some where between 30 and 40, which works well for me.
There seems to be a weird glitch sometimes though, the mod sporadically “forgets” the joules setting and jumps to max joules. I can’t figure out what causes this, nor can I reproduce the behavior, it just seems to happen at random. Despite this glitch, temperature control seems to be pretty accurate. Every hit is consistent, there is no pulsing sensation like you find in most of the cheaper temperature control chip sets coming out of China. There is also a missing component that would make this kit so much more versatile. It could really benefit from an RDA adapter to allow the use of “traditionally” shorter RDAs with this mod.
Performance
The chip set used in this mod is a Smoant proprietary board design. It seems to perform as advertised in their published specifications, although there are a few areas where it could be somewhat improved. For starters, there is a USB port on the side of the mod for charging, they could have also included an ability to use it for firmware updates. The second point of improvement would be the addition of manual TCR modes. If it had these modes, it would be a true contender against some of the hottest mods on the market, instead of just being a good starter kit.
The third point of improvement is power management. The mod will only go to 60 watts max, so there is no reason for it to eat batteries as fast as it does. Head to head against my JoyeTech eVic VTC with identical settings, the same battery will only last about 2/3rd to 3/4th of the run time. This is pretty bad and definitely could be improved.
Despite the performance improvements that could be made, the chip does perform very consistently for the features it has. I’ve already compared it’s power management against the JoyeTech chip set, and now I will compare it’s performance. Unlike the power management though, this Smoant chip set performs every bit as admirably as every mod I own with the Wismec/Joyetech chip set for the features it does have.
[button color=”red” size=”big” link=”/likes/101knightv1″ ]Buy Now![/button]
Talos Tank
This is the second part of the “kit” review and it’s where I will go in depth on the included Talos sub tank.

Specifications
-
Tank Size: 22mm (Diameters) *40.5mm (Height) Not include drip tip
-
Tank Capacity: 4.5ML
-
Top Side Filling Juice, cleaner and easier.
-
5 Different Types of coil heads to satisfy different vapers demands
0.3 ohm Kanthal A1 dual coils
0.5 ohm SS316L coil head
0.5 ohm Clapton coil head
0.5 ohm Titanium coil head
0.5 ohm pre-built RBA coil -
Wick materials: 100% USA made SS316L wire and Japanese organic cotton
-
Can be also to accept Kanger Coils
-
304SS + Pyrex Glass tube
-
Easy to Clean, all components can be disassembled
-
Adjustable Airflow Control system
-
Also can accept Kanger coils
Fit and Finish
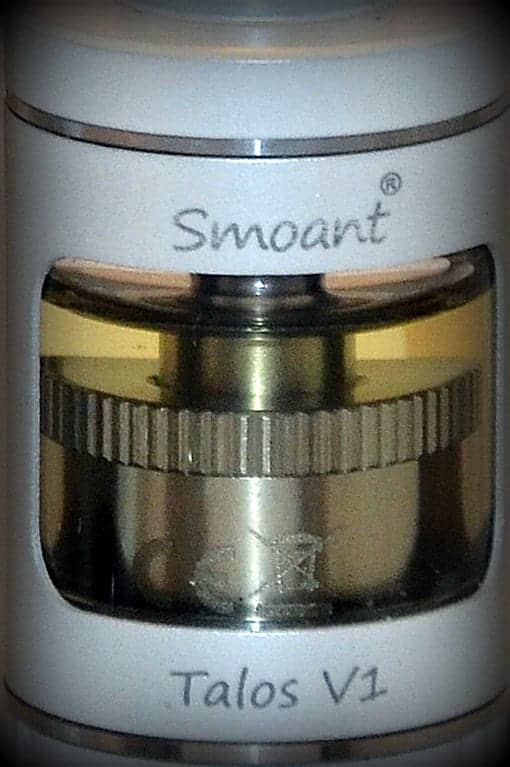
Much like the Knight V1 takes it’s design queues from other mods, the Talos V1 does the same. The Talos is a combination of the Freemax Starre, Joyetech Cubis, and Kanger TopTank. Basically, the base is similar to the Starre, and the tank section takes it’s inspiration from the Cubis, while the top, the threading of the base, and the coils are from the TopTank. Where it fails to deliver is in the quality feel of the tank, the Talos just feels cheap where the others have a more quality feel to them. While the threading does it’s job, none of it is nearly as smooth as I would have hoped, an indicator that the machining could have been a little cleaner.

Smoant has their own coils and they mimic their Kanger counterparts, but they feel inferior to the originals. Both versions, however, work in this tank. Smoant also has their own RBA deck for the tank, and it seems to be identical to the Kanger deck. The finish on the Smoant Talos V1 is color matched to the mod, and seems to be every bit as durable. There are some nice “chrome” accents between the tank and the top and bottom, giving it a classic and very stylish look overall.
It is so close to Kanger specs that most of the parts are interchangeable with the TopTank parts. In fairness, mixing and matching between Kanger and Smoant *may* have undesired results, but for the most part it should work. The quality of the tank does not feel quite as nice as the aforementioned TopTank, with one exception, it’s been working pretty well. We will get into the specifics of the exception a little later in the review.
The base of the tank works like the Freemax Starre, there are two slots for airflow with a pin in either air slot to keep the ring from spinning freely. The design of the Talos V1 glass tank section is very reminiscent of the Joyetech Cubis tank with dual viewing windows to see your juice level. The top piece has a knurled “nub”, for lack of a better term, where the drip tip goes. The knurling serves a dual purpose, it holds the drip tip, and serves to provide a grippable surface to open the top and fill the tank. Pre-mounted in the nub on top is a stubby silver drip tip that goes well with the Talos tank’s chrome accents.
Usage
The tank is pretty easy to use, simply screw a coil into the base, screw the base onto the glass tank, fill it with juice, screw on the top, and you are ready to go. For best results, as with any new coil, make sure you prime it prior to installation. At 4.5 ml, the Talos V1 holds a really good amount of juice for a tank it’s size. It was clearly engineered to be as small as possible with maximum capacity. Vapor production is on par with the Kanger Subtank and TopTank. The flavor from it is about equal as well, which should be expected since the coils are interchangeable.
[button color=”red” size=”big” link=”/likes/101knightv1″ ]Buy Now![/button]
Now lets talk about that one exception. The only real issue I’ve had so far with the Talos has been with trying to use an RBA deck. The problem is not only with the included RBA deck, but also the Kanger RBA deck as well. It seems that the center pin in the base of the tank is just a little on the short side. When used with a pre-built coil, it works perfectly, however as soon as I switch to an RBA deck, the pin no longer makes contact with the center pin on the mod.
Initially I thought it was the Knight V1 that was the problem, but then realized that the tank had the same issue on several different mods. It took a lot of work to narrow it down to the center pin, but switching back and forth between a pre-built coil and the RBA deck was how I finally figured out what was happening. The pre-built coil worked perfectly in the tank on every mod I own, while the RBA deck only worked in a couple of mods. The threads that screw into the tank base are a little shorter on the RBA decks (both Smoant and Kanger are identical), than the threads on the pre-built coil, by about 1-1.5 mm. This seems to be just enough to cause sporadic connections on some of my mods, including the Knight V1.
Conclusion
Here is where I am going to circle back around and combine the two parts (or mini reviews) back into a single combination that covers the entire kit.
Smoant got a LOT of things right with the Knight V1 Kit. While the Tank and the mod are separate pieces, they combine into a sum that is greater than the individual parts. Each part has it’s strengths and weaknesses, which I will recap here in the context of the complete kit.

On the positive side, here are the highlights.
The Talos V1 and the Knight V1 share a unified color and finish that works really well. The color is consistent across them, and the stainless/chrome accents on each piece really help to tie them together as a singular design. It’s a simple setup, for a good starter kit, but powerful enough for an intermediate or advanced vaper to enjoy it. The Knight V1 has a small feature set, but that actually works in it’s favor. It may be a small feature set, but every feature works exactly as expected.
Together the set is still small enough to easily carry in a pocket and very comfortable to hold. The Talos tank has some pieces that are interchangeable with the Kanger TopTank and can use the standard Kanger Subtank coils. The integrated tank guard on the mod looks great and provides a safety net for the tank if the mod falls or drops. Temperature control is solid and functional, albeit slightly limited, but it’s as consistent as my best mods. The adjustable 510 plate for airflow is sheer brilliance, and works really well with every single tank I tried on it.
Now for the negative bits, there are quite a few of them.
Lets start with the worst fault, as it could potentially be dangerous. I’m talking about placement of the battery cap and venting, coupled with the lack of a spring loaded positive contact, which could lead to serious injury if the battery gets damaged and vents, as it points directly at your face.

Next on the list is the button rattle. Thankfully it is only the fire button that rattles, not all of them, but it could have been avoided. The screen for the display is really small by today’s standards, and unfortunately, mine is mounted a touch crooked. It’s HEAVY, possibly too heavy for many people. The center pin in the Talos tank is a touch too short to use the RBA base reliably, although the pre-made coils have a slightly longer base and work with no issues.
[button color=”red” size=”big” link=”/likes/101knightv1″ ]Buy Now![/button]
Functionally, the singular glitch that causes the joules to randomly max out is annoying, but since temperature control works, it doesn’t pose any real concerns. The lack of an RDA extension does limit the use of the mod to tanks only, but as a basic starter kit, that isn’t necessarily a horrible thing. Finally, I’m not sure why they didn’t make the mod capable of firmware updates, with a USB port, it seems like it would have been easy to make it update-able.
Despite the number of “flaws” I found, Smoant has a pretty good kit here. They took the time to ensure that every feature is consistent and works as expected. Even though there are a large number of “issues”, the bulk of them are more annoyances than problems. What really hurts Smoant most is the safety concern I have with the battery venting, almost every other fault can be chalked up to either quality control issues or poor design decisions. Overall, I like this kit a lot because it is a good, solid setup that will grow as the vaper does, to a point anyway. I do wish they had included the ability to upgrade it so that it would stay relevant, and maybe added an RDA adapter to the kit. Those are the little things that would have brought the Smoant Knight V1 kit to a whole new level.