Building your own RDA coils can seem like a daunting task when seeing what other people are building, or even watching your local shop do a rebuild. I know that I couldn’t have been more happy than when I built my very first using 26 gauge Kanthal.
Don’t get me wrong, by no means was it pretty, but it worked and opened the door to endless coil building possibilities. Whether you are researching for building your first, or have done a few builds and just want to make them a little better I wrote this to share what I have learned so that you can get to know how to build a coil.
In my experience the RDA coils that are meticulously installed, are the ones that provide the best experience. Wrenching down your RDA screws often does more harm than good.
Poor RDA maintenance is another culprit for another discouraging RDA coil building attempt.
It isn’t surgery, but it’s pretty close, so if you take the time to straighten your Kanthal, why wouldn’t your installation be just as careful?
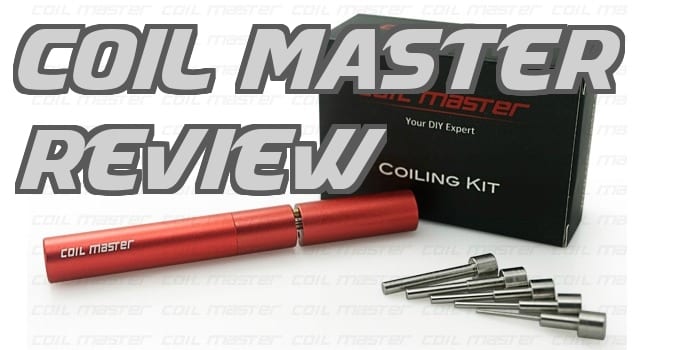
Kanthal A1 heating coil in the best in class wire you can find for your RBA
Wrapping your RTA/RDA coils:

I prefer using screwdrivers that have a lip on the handle for wrapping. This allows you to use your thumb to maintain pressure while you wrap.
I find that the Steam Engine Vape Calculator is an invaluable tool, especially if you don’t own an Ohm-meter. The accuracy of this site is fantastic, and in my experience is accurate to plus or minus 0.1 ohms. More often than not, after I install my coil builds they read out exactly what steam engine calculated.
The actual wrapping is important from the beginning of coil building. If your wire isn’t straightened, you are going to build a sloppy one. I started straightening my wire as best as I could by hand with mixed results.
I eventually broke down and purchased a Ryobi drill, and get perfectly straightened wire every time. Whatever you decide to use to wrap your coil around, make sure you are keeping constant tension on the wire. I have been unable to snap Kanthal or nickel wire by hand thus far.
The end result of wrapping with even tension is a gorgeous coil that doesn’t require much adjusting.
Do your best when wrapping them to keep them as uniform as possible. I have seen a couple of methods for this. First is the more traditional wrapping the wire around your screwdriver or drill bit with your off hand. The second would be rotating your screwdriver or drill bit, while maintaining tension with your other hand. Whatever your personal preference, the end game is always uniform wraps.
Quick Tips
- When I wrap a coil I am as careful as possible to keep firm and even pressure with my off hand on the wire. This ensures that your inner diameter will be as even as possible.
- If your first coil looks like the picture below don’t worry, you can still make a perfect version with a little patience.
Installing your RDA coil builds:

Keeping your coil on the screwdriver or drill bit allows for more precise installation. Additionally it maintains the shape during installation.
While Kanthal is a more forgiving wire to install into your RDA, nickel wire is not. It is paramount to the effectiveness of your build that your nickel wire is trapped in the center of your post-holes. That being said, why wouldn’t you install Kanthal wire the same way?
I have found that using my screws to trap the wire inside the post-holes sacrifices conductivity. Taking a little bit of extra time during the installation to ensure your coil build is in the center of each hole pays off in the long run.
I started building mine by wrenching my post screws down as tight as I could get them. This more often than not damages the wire or wires and prevents a good connection. I tighten my screws down just past finger tight, and I have found my coils are far better connected than wrenching them down.
Also if you re-use the vape coil builds, the legs that are installed are undamaged with carefully securing them under the screws.
Knowing your RDA is also important. For example the Plume Veil V2 has very sharp screws right out of the box. The Hobo V2.1 utilizes “grub” nuts, which are flat on the bottom.
Also realizing that after you heat up your coil build, it expands and contracts is key.
I pulse the firing button on my mechanical mod or box mod to check for “hot spots”. These are areas of the coils that heat up the different areas. It is important to have one that heats up evenly from the inside to outside of the wire.
This can be achieved by “pulsing” or momentarily pressing the firing button on your device, releasing it after the coil is red hot and using tweezers or pliers to crimp the wraps together. Holding slight pressure with your tweezers or pliers will cause your coils to settle more evenly, this also is the time to correct any imperfections or gaps that occurred during the wrapping process.
You can re-insert the screwdriver or drill bit back into it to readjust positioning, and ensure it is lined up with your airflow on your RDA. It is important to note that you should never dry fire nickel wire builds, this will damage the coil and cause issues with your temperature reading.
NEVER under any circumstances introduce metal into your live electrical circuit while it has power.
Quick Tips
- Leaving the screwdriver or drill bit inside your coil during installation will give you complete control for perfect post hole placement.
- If your coil isn’t perfectly aligned on your build deck use the tip of your screwdriver or place your thumb over the coil to move it into place.
- Inserting and removing your screwdriver a couple of times is a good way to remove any remaining hot spots after your coil is aligned.
Wicking Your RDA Coil:

When first installed most builds aren’t perfect. This is where your adjustments make or break your coil. I prefer using ceramic tweezers to pinch my coils together while pulsing my device. NEVER use metal on your coils while pressing your power switch. This will cause your device to short out.

Once all of your adjustments have been made, your coil should heat up evenly from the center to the outside.
I personally use Japanese organic cotton or Cotton Bacon by Wick N’ Vape. There are a bunch of different wicking materials out there from silica, to stainless steel mesh; this decision is up to personal preference. It should be noted that failure to oxidize your stainless steel mesh would result in a short in your coil.
The advantages of organic cotton are superior flavor, as well as it being readily available and cheap. Organic cotton is also very easy to work with, as it can be made to fit just about anywhere in your RDA.
I have personally used, as well as seen many different methods that teach how to wick RDA coil builds. The point behind the wicking material is to ensure that your coil has sufficient juice supply to prevent charring your wick.
For example a super Nano (a coil wrapped around a piece of Kanthal wire) has an impossible to wick inner diameter. Placing a cotton cloud (a small bit of wispy cotton) underneath provides juice to the coil and intense vapor production.
As long as the wick is in constant contact with the coil, and saturated thoroughly with e-liquid, you will have an amazing vape.
Certain vape coil builds require a certain wicking method; the Nano dragon will not perform the intended way if it isn’t wicked properly. Like with the super Nano , the Nano dragon is a small diameter coil build. The Nano dragon is angled down away from the positive post, and the wick closes off the backside of the coil.
This provides a blanket of wick to the coil that causes vapor to shoot out of the top. The best part of wicking is experimentation. You can wrap the exact same coil as someone else, but if you’re wicking is different you may be getting a completely different experience.
Some people say less is more when wicking, but on lower Ohm builds require much more liquid. Keeping this in mind ensuring that your wick fills up the entire diameter of the wire, and fits snug will result in better juice distribution. As long as your wick doesn’t impede on the airflow of your RDA, you can do whatever works best for you.
Vape Wire Selection:

TemCo Industrial manufactures American made wires, and Lightning Vapes is imported wire. I use both, however I have noticed TemCo wire leaves less residue when twisting or straightening your wires.
With a coil build from a brick and mortar shop running about $10, and a spool of Kanthal running $7.75 for 100 feet of 28 gauge it’s more cost effective to do yourself. I have also found that you aren’t going to get twisted builds, or Clapton coils built from your local shop. If they did, I am sure the cost would be insane based on the difficulty of certain RBA coil builds.
Nathan has already published an article about different suppliers of wire. The two that I have used are Lightning Vapes and TEMco Industrial. I won’t go into too much detail on the particular shops as the article about them already has that information. In my experience TEMco Industrial has a longer time to wait for orders of nickel wire, where as Lightning Vapes seems to have an endless supply of wire.
TEMco Industrial is based in California, and is also the manufacturer of “Vapo Wire”. Lightning Vapes is based in Florida and is slightly less expensive. Lightning Vapes is imported wire, and TEMco is American made.
That being said wire selection is what can make or break your particular build, or possibly even turns you off to rebuilding. I have found that 26 or 28 gauge wire is a good starting place for anyone getting into rebuilding.
While 26 gauge Kanthal is springier than 28 gauge, it is a more substantial wire and once straightened it is fairly easy to work with. Doing some research will help you make your decision on which to purchase first or buy some test wire from your local vape shop.
26 gauge wire has a lower resistance than 28 gauge, meaning that it will require more wraps of 26 gauge to create a 1.0 Ohm coil than with 28 gauge. That being said lower resistance wire is required for lower Ohm building.
For example in order to wrap a 0.2 Ohm coil with 28 gauge around a 3/32nd drill bit, it would be a dual coil consisting of 2 wraps. This sacrifices vapor production as well as flavor production, so using 22 gauge Kanthal in the same scenario would require 7 wraps, providing greater surface area as well as vapor production.
There are many different types of wire out there for coil building, ranging from Kanthal to G-Plat wire. Each wire has a different purpose, and offers something different to your vaping experience.
Ribbon wire offers incredible flavor, but doesn’t produce very much vapor by itself. Twisting wires together creates juice channels within your coil build. This translates to a wire that has wicking properties by itself; in addition to getting better heat with a ribbon wire build.
There are literally thousands of videos on You Tube, and a lot of them are works of art. You as the builder have the advantage of being able to take a coil build and add to or take away from that particular building idea. Once you start building your own, you can start testing different builds and find your perfect match.
I started by building standard dual and then parallel coils. I was incredibly happy that I had built what was making the vapor in my RDA; from there I started building those that looked interesting to me.
I would recommend spending a couple extra dollars and getting an Ohm-meter to ensure that your coils are safe, as well as safe batteries. The Samsung 25R 2500 mAh, LG HE 2500 mAh, or the Sony VTC 5 batteries are all good options for relatively safe and are on our best vape batteries review.
We hope this guide has helped you in your quest to learn how to build a coil. Please feel free to leave a comment below if you have any questions.

Thank you for the article. But I think you need a better photography Macro skill. I couldn’t differentiate between each, also since English is not my first language and the description doesn’t help.
I apologize for the picture quality, the detail on the coils is very intricate. If you have questions please feel free to ask them, I assure you the coils are worth the time.
Agreed that the photos leave a little to be desired. But a bigger concern of mine is why didn’t you link to the videos where you learnt how to make these? You do mention them, but then leave it up to the user to find them him/herself. I think it’s only fair to link to the source, and it would also answer the concern of people who can’t read/follow the instructions.
All that said, this is a good summary article and well worth posting, so thanks for that.
Are you really that lazy you can’t look up Rip Trippers on you tube? Any serious vaper is well aware of their resources. Jesus..learn how to use goolge.
Any serious vaper avoids Rip Tripper like the clap. He may have been relevant a couple of years ago, before he began to shill anything that comes with the right sized fee.
It is impossible to trust anything this man says now, not to mention the cringe-worthy persona he has adopted as part of his schtick, Trippers has become a ridiculous caricature that is truly vomit and epileptic seizure inducing. Serious vapers, like good reviewers, are embarrassed by the man and look elsewhere for honest appraisals and excellent advice. By all means use Google but don’t forget to add ‘- Rip Tripper’ to ensure you to ensure the results omit this unfunny clown.
YA!
you need better glasses.. I can count the wraps on the coils without my glasses on.. look fine to me.
Nice writeup and no doubt some will try them but i have found regardless of the coil build the difference (if even noticeable) is extremely minimal at best .
Definitely not noticeable enough to take more time making them i should say . Imo people get to caught up with (what coil provides the best flavor) jargon and get convinced there are major differences between them .
I just don’t buy into it and think a standard well wrapped basic coil performs every bit as good.
As i said just my opinion and good job nonetheless.
In my experience a standard coil whether wrapped with Kanthal or Nickel, or a micro coil will not achieve the same amount of flavor. The reasoning behind this is that a standard coil doesn’t hold any liquid, it only vaporizes what is provided to the coil. These coils provide supple area for vapor production, and the nuances within the coil provide flavor that will have you questioning your favorite shop juices. In a side by side comparison, these coils taste better than standard, or parallel coils.
I agree I agree !! Great job !!
Thank you kindly Jay I really like building!
i agree with you i think people buy in to the hype i think
for grat flavor on a mech spaced low ohm coil works best for vw/vw tight high ohm coils
IMO you couldn’t be more wrong, my experience has been the complete opposite, I do build more intricately then most, and to achieve immaculate flavor your coils must have juice channels for it to sit in, and the more channels and layers for juice to hide the better the flavor, and the builds listed above are the foundation for flavor, then there’s a wholenother level that can be tapped into like with the most recent builds I’ve done, check out my IG https://instagram.com/coilbuildn_pitbulldaddy/
I’m 100% serious when I say you haven’t really tasted your juice if your only doing single wire builds, meaning if your were to try it with some of the more intricate builds you would truly be surprised
Thanks Chris, I checked out your builds and they are works of art. I’ve done a couple different stapled, and fused coils that I enjoy. You’re right as far as a base for coil building. These are fairly easy to build and produce for me.
Some of those are where all the fun started, and this vaping deal turned into a hobby, lol
I totally agree with you!
big difference in flavor and vapor just u saying that shows ur
ignorance toward vaping
Like most I started with simple coils, then twisted coils, then for several months cloud chasing coils and later on flavor coils. The coil build really does make a huge difference. Call this a tutorial of coil builds to learn..
Single wire simple coil. Just like it sounds.. the most basic of coils.
Twisted wire coils. two strands of wire, twisted together.. slightly improved flavor over single wire coil
simple parallel coil.. 2 (or more) strands of wire wrapped into one coil. basically this is 2 coils in series. Much faster ramp up and cloud production than simple or twisted coil, less flavor than twisted coil. (slightly)
Now the fun begins…
Single core clapton.. straighten and mount about 8 inches of your main coil wire in a drill, then using a very high ga 32ga, 34ga or higher and wrap the main wire with the higher ga wire. It looks like a guitar string *hence the name clapton* and provides a huge flavor improvement over any build previously mentioned.
Parallel clapton.. 2 or more strands of wire wrapped in a higher ga wire.. (32ga or higher) again a huge improvement over ANY previously mentioned coil.
For advanced builders.. you can use pretty much any combination of coils listed above add flat ribbon wire and clapton (wrap) them together I prefer a daedalus coil wrapping jig (with the drill that comes with the kit) to make complex coils.
For example.. 3x single core (26ga) clapton with 1 strand of flat ribbon wire between the claptons.. kind of like @I@I@ then wrapped together with say a 36 to 40ga wrapping wire. This is where the daedalus will come in handy to keep all those wires in position while wrapping. This build will make previous builds taste like tofu by comparison.. LOL. (plain tofu is probably the most boring food on the planet..lol)
So yeah, coil build really does have an impact. particularly with flavor and also with ramp up and cloud production.
Ata boy Mike
Thanks Doc!
I didn’t expect you to agree with me Mike lol, this is just from my experience and from talking to many many others about the very thing (juice holding capability) you mention.
Side by side tests just don’t show a difference or if their is a difference it’s barely noticeable from long discussions on these different coils with many other very experienced vapors.
VU and ECF have very in depth discussions bearing this out.
If you or others feel differently thats perfectly fine as well .
I appreciate the comments, and point taken. I personally enjoy building coils and enjoy the challenges that come with them. If your experience is enjoyable why change it?
I agree with Chris in the issue of these “trendy coils” being SO much better than regular parallel micro/macro coils. in my experience, the difference is minimal and the “trendy coils”, while looking pretty extravagant, are a pain in the ass to build and as they might deliver slightly better flavor, simply aren’t worth the time that goes into them. Just my two cents, to each his own! Interesting read though, thank u.
Well done Mike. The secret to life is enjoying the passage of time. Can’t wait for your next article.
I haven’t been a big fan of clapton but had yet to see the tidal coils on r/coilporn or twisted’s channel. Threw together a tidal with two 32 ga and .5×1.0 mm ribbon. Dang son; tis a vape to remember.
Thank you Nate, I’m glad you enjoy it. As Chris said these are base coils for getting into more intricate coil building. The Tidal wire is usually in one of RDAs at all times, it holds a lot of juice. Congrats on the Tidal wire success, I wrap those for my buddies and the shop guys all the time. Enjoy!
Hey Michael thanx so much for the insight to coil building I can hardly wait to get home and build one
Keith, enjoy! You will be pleasantly surprised by the outcome. Stay tuned for more!
Yeah! Why no links?
working on it.
I certainly agree that Clapton builds are superior in flavor. I have experimented with tightly wrapped, single and multiple Clapton builds, and find multiple core Clapton builds work the best. I have used 26g cores with 30g wrap. I’d like to try multiple 28g with either 32g or 34g wrap, but higher than 30g Nichrome is scarce around my vaping community. I need to order off the internet, but not ready to pay shipping charges. One of my biggest issues with coil builds are the quick resin buildup from burnt sugar. I’m currently using (2) 26g Nichrome core with 30g Nichrome wrapped for a (4) wrap micro coil. It runs at .17omhs for a very sweat taste at 24 watts, but somewhat hot vape. I’ve read that macros have better flavor and cleaner outcomes.
I wrote this when I first got in to building man. Since this article I don’t use anything lower than 36 gauge N80 for Clapton wire. As far as favorite builds currently for flavor and vapor, are Aliens, framed staples, or framed multi strands. There are a few reasons why I don’t use lower than 36, the main one is eliminating ramp up time to the coil. Also the resistance of the higher gauge wires (36-50 gauge) is negligible, meaning faster ramp up. The alien coils have amazing wicking properties as well as surprising lifetime. These builds were what got me in to building and hooked on finding the next coil concept to build.
When you say ‘anything lower than 36 gauge’. It means you won’t go to a thicker wire, am I reading that correctly?
A lower gauge wire would be a thicker wire. So nothing thinner than 36.
Nikko, what I mean is that I do not use anything thicker than 36 gauge wire for my wrap wires. I find that I can have more “inside” the build with higher gauges 42-50 gauge for the Clapton wire. Also I think aesthetically the thinner/ higher gauge wires look clean. The traditional Clapton wires of 30 or 32 gauge take a while to heat up, so I stopped using them for claptons. They do make learning the Clapton technique at first, once you have it down I would bump up in gauge.
I see what you mean now. Made some 26/36 fused claptons from kanthal last week and they are very nice, such a smooth vape and they ramp up very quickly. How thin do you normally make your claptons?
Twisted 26g kanthal 5 wrap parallel on a mech great flavor way better than regular parallel builds. Fact proven by me vape on. #CLOUDS
if so to cool i used your videos to get certified in 2012…
i also used Vaping to stop smoking in October 2013….. even done with the nicotine… nothing but 0mg nic max VG …. im a dripping flavor junkie…. Love the Vaping world
Thanks for sharing it
I just started vaping about 2 months ago, and I am already bored with the replaceable integrated coils for standard tanks. I have just ordered my first RDA, and cannot wait to get it and start building. This article is very informative and I think that it is a good starting point for me.
I do have one question; when you refer to more intricate builds what is it exactly that you are talking about? I was under the impression that a coil was just wrapped wire.
Good guide. Shows new coil builders that it isn’t rocket science and coils can be fairly forgiving. I spent about 8 months researching what I call coil theory. (properties of different wire types and configuration and resistances) because I a slightly OCD when it comes to research. LOL.
one of my favorite single coil builds is for a kanger toptank mini RBA.. triple parallel 32ga wire 7 wraps on a 2.25 id core. It runs at about 40w and with 21 “loops” gives a huge cloud. (comparatively, considering deck space ect.)