

SAT22 Genesis Atomizer Clone Review
The SAT 22 Genesis style atomizer is made by Satburn, and the atomizer itself is often referred to as the Satburn 22. Satburn the company is run by Andreas Vassiliou who is a modder from Larnarca, Cyprus. The authentic SAT 22 was actually released about a year ago, and still retails for $225.00 USD where available.
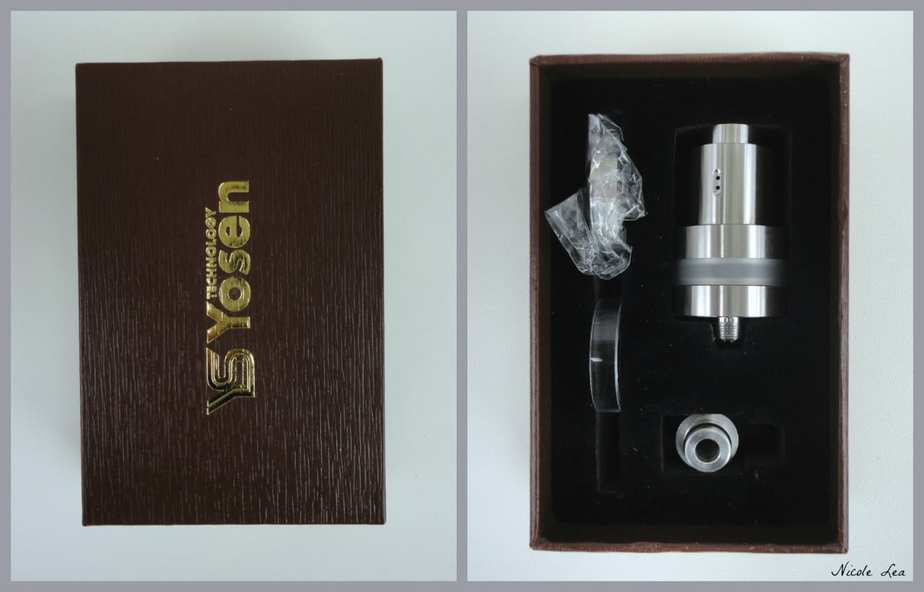
The 1:1 SAT 22 clone featured in this review was provided by Yosen Technology for the purpose of review. The SAT 22 is packaged in a branded gift box, and it includes two spare tank, and parts package.
[box type=”shadow” align=”aligncenter” width=”600″ ]
Where to Buy a SAT 22 Clone:
- Buy from $9.59 and up – Multiple colors, ships from China
- Buy for $14.51 – Ships from USA
- Buy for $18.95 – Free shipping from USA
[/box]
SAT 22 SPECIFICATIONS:
- Brand: Yosen Tech
- Material: Stainless Steel
- Type: Genesis style atomizer
- Connection threading: 510 adjustable
- Diameter: 22mm
- Height: 54mm
- Weight: 49 grams
- E-liquid capacity: 3.0 ml
BUILD QUALITY
The SAT 22 Genesis style atomizer with its three tiered body, is probably one of the most aesthetically unique rebuildable atomizers that I have seen this year. I find the combination of simple, clean lines, and quirky originality to be quite eye catching. It seems that the release of the SAT 22 clone brought with it a resurgence of interest in Genesis style atomizers overall, which had previously been on a decline in the market.
The machining on this SAT 22 clone is quite good, and I cannot find any flaws in either the machining or construction of the device. However, I do notice that the drip lacks a chamfer around the bottom as seen on the authentic, which is nothing major but needs to be mentioned since this is marketed and sold as a 1:1 clone. In the photo below it appears that there is a gap between to the drip tip and upper chamber however, that is just my failure to fully install the drip tip before I took the photo.
The SAT 22 clone breaks down into 5 basic parts, which are the base with a center post, the tank section, the build deck, the chamber/top cap, and the drip tip. There are also two extra tank sections included for a total of 3 tank options, clear pc, frosted pc, and stainless steel.

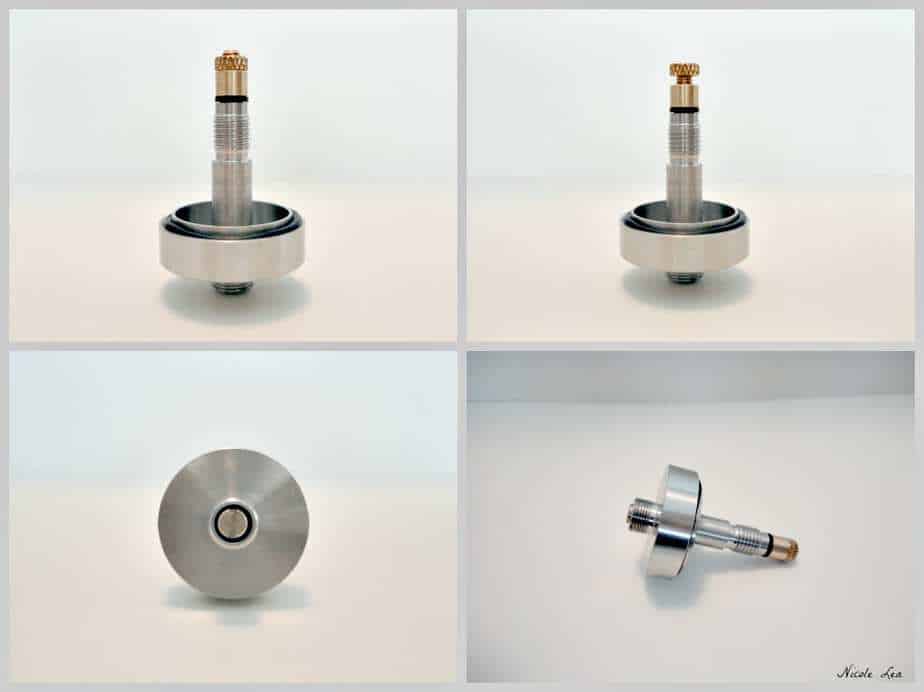
The center post of the base is threaded, which the deck then screws onto. Above the center post threading there is an insulator, and a brass screw and threaded brass bolt for catching the positive lead. For those who may have concerns about brass parts, you should know that there is no risk of this brass portion of the atomizer coming into contact with your e-liquid. If that does not satisfy you, there are full stainless center posts available on some clones.
The threads on both the center post and the 510 connection are perfect. There is a black o ring pre-installed to the base which helps to secure the tank section of the atomizer. The 510 contact pin is bare brass, and adjustable which makes this atomizer compatible with any type of mechanical or regulated device.
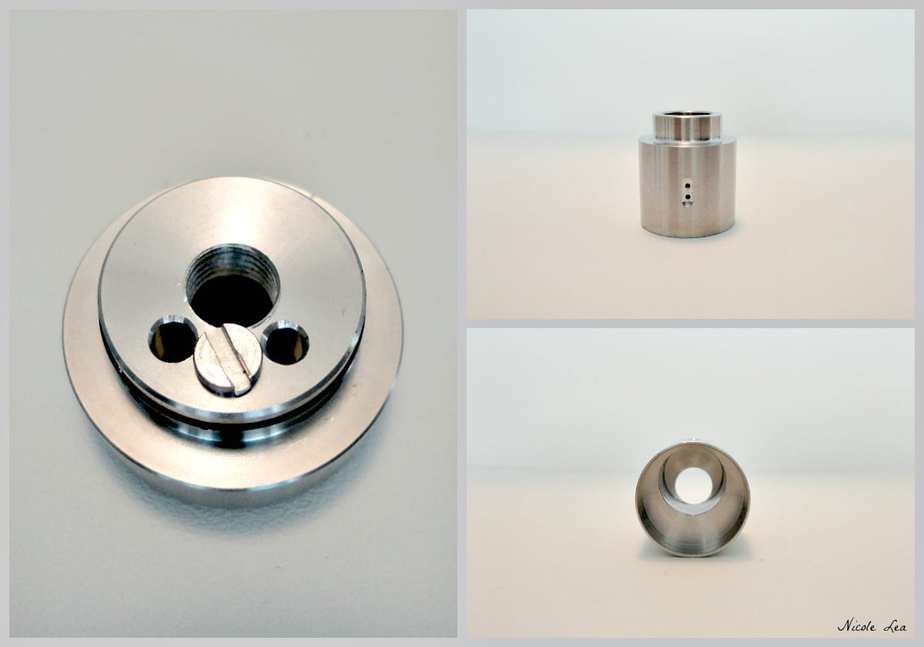
The build deck has two wick holes of differing sizes, one is 2.2mm (right), and the other is 2.5mm (left). I am not sure why the original modder saw fit to have two different size wick holes that are so close in size. Does .3mm really make that much of a difference? There is a nice flat head screw for the negative lead, and I do like this type of screw which is flat at the base because it secures the lead the better.
The top cap/chamber has two vertically aligned .8mm air holes, which will certainly make for a tight draw for some vapers. While Genesis styles are known more for flavor than producing clouds, I am still a bit surprised that Satburn chose to go with such small air holes. I think two air holes sized at 1.0-1.2mm would have been ideal. Adequate, and adjustable air flow is the main reason that Genesis atomizers like the Kraken were so successful.
The inner chamber of the top cap is reduced, which is supposed to make for a more enhanced favor. I will offer my thoughts on how successful I find the reduced chamber to be later in the review.
BUILDING A GENESIS STYLE ATOMIZER
I think that one of the reasons that Genesis style atomizer have not been as popular as bottom coil atomizers is because some are intimidated by working with stainless steel. Genesis builds with stainless steel mesh are more involved than working with other wick materials, and there are a few things that you need to know in order to safely, and successfully build with SS mesh.
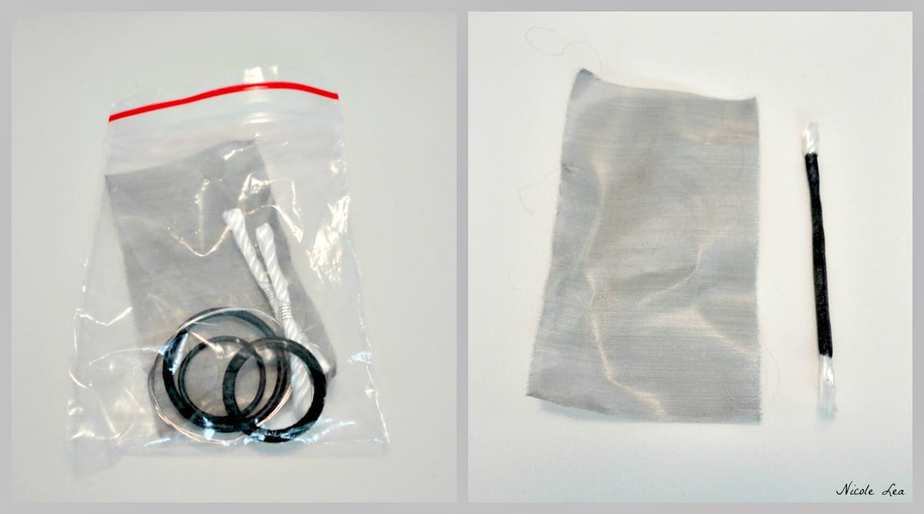
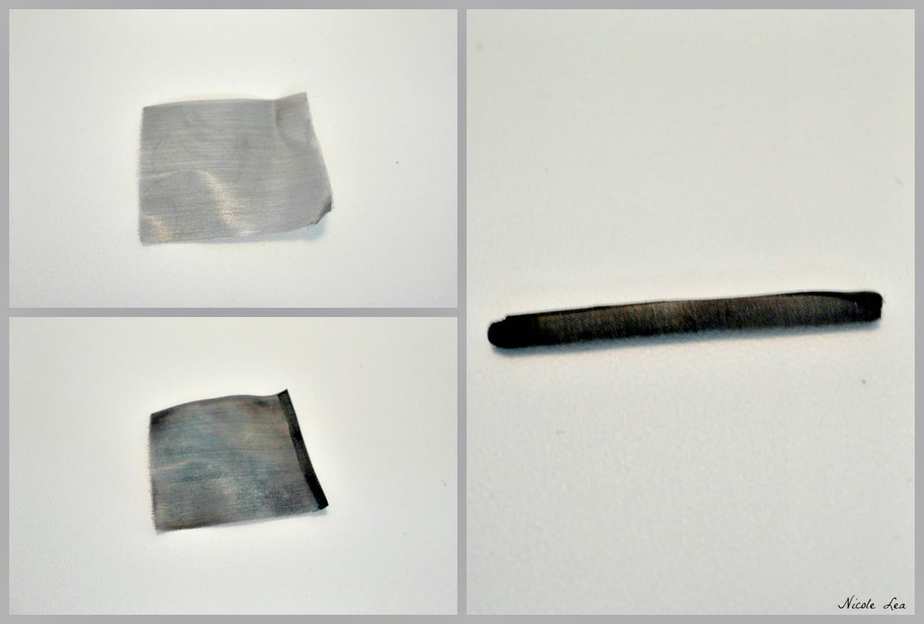
Included in the parts package there is one piece of SS mesh, which is enough to make at least two wicks. One good thing about SS mesh wicks is that they last for a very long time. You can literally use one mesh wicks for months, as I have done. In the 2nd photo on the right you will see an old SS wick that is my own style of wick, and its uses a 1.5mm silica wick down the center. Just now I decided to name it the Nikki wick, lol.
When I first started using Genesis style atomizers, I had two concerns which were a) possibly shorting out my device due the SS mesh touching the bottom of the tank, and b) consistent wicking when the juice level in the tank becomes low. This style of wick was my early answer to those concerns, and it is a good answer too. Before using the wick shown in the photo I would actually cut off the top of the wick to size with whichever Genesis I was going to install it, but the bottom silica tail would remain. With this style of wick, tilting for good wicking was never necessary.
For the sake of this review I am going to use a traditional pre-oxidized SS mesh wick. The purpose of oxidizing the SS mesh prior to installation is to create a carbon layer between the SS mesh and the coil, wick hole, and tank to prevent shorting, and hot spots. There are those who prefer to use the Pulse method (no pre oxidation) for oxidizing their SS mesh wick once installed however, I do not like this method because I feel that the chances are high for having to re-work out hot spots after the initial build is done.
Making a pre-oxidized SS mesh wick:
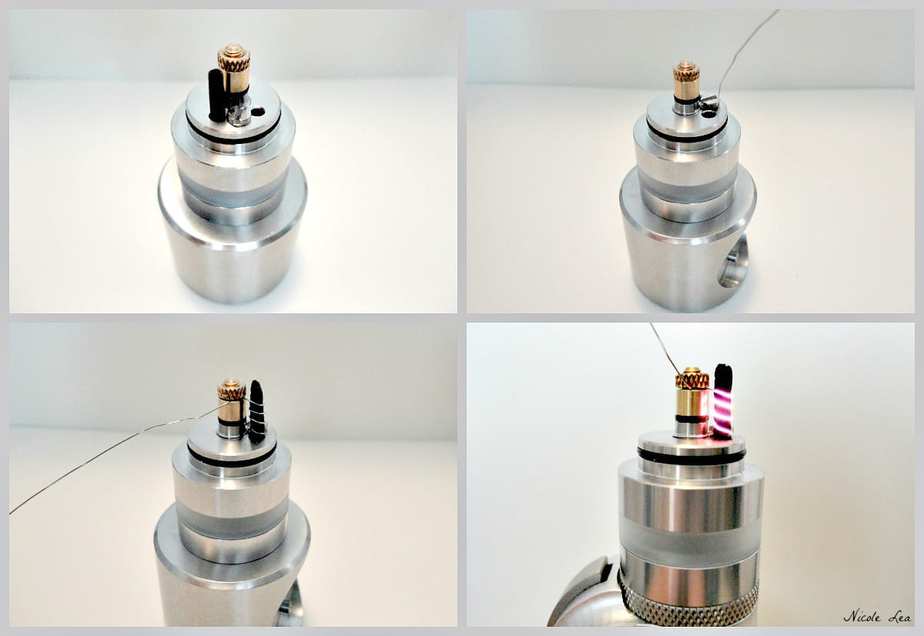
- Cut the provided SS mesh in half. The wick will need to be smaller than 2.5mm in diameter in order to fit properly in the wick hole without choking.
- Using a pair of tweezers to hold the mesh, pre-oxidize the mesh either by torch or by stove, enough to create a visible carbon layer on the mesh.
- Create a fold on one side of the mesh. If you look closely as the mesh piece you will see the fray along the edges. These frayed edges can create a short or hot spot if left exposed.
- Begin rolling the mesh from the opposite end (non folded end), so that the folded end of the mesh is one the outside of the wick when done.
After the SS mesh wick is rolled, drop it into the wick hole to make sure that it a good fit. If you have to force the wick into the hole then it is too big. If the wick is too big you can reduce the size by continuing to roll the wick between your fingers, then re-check the size in the wick hole again. Once the wick size is good, I oxidize the wick again before I install it.
For coiling the wick sometimes I will pre coil the wick off the deck, then install it. For this build I decided to coil the wick while it is installed in the wick hole. Using 27 gauge kanthal wire, first I secured my negative lead under the deck screw(2nd photo right), then I drop the wick in and begin to coil the wick from the bottom up. It is important that you do not wrap the wick too tightly which will choke the wick however, it is even more important that you do not wrap the wick too loosely. The coil must be touching on the wick on all sides, otherwise you will have a hot spot that cannot be worked out.
When you test fire your build what you need to look for are hot spots, which is when one or more coils are lighting up more brightly compared to the other coils. If you have a hot spot you can usually work them out by using a pick or a flat head screw driver to move the coil either up or down until the hot spot is worked out, and your coils are all glowing evenly. That is the goal here, to make sure that all coils are glowing evenly before you fill up your tank.
There are some who choose to use cotton in their Genesis style atomizers, but then it is not really a Genesis. I have used cotton in a Genesis, and it was alright, but I still prefer to use SS mesh with Genesis styles.
PERFORMANCE
The SAT 22 appears deceptively small for its 3ml e-liquid capacity, which is accurate. One thing to be mindful of is the open wick hole, which doubles as a fill port. A Genesis needs to remain upright in order to prevent leaking. You can use a piece of cotton to plug up one of the air holes, but even then I would not leave it to lay on its side for more than a few seconds at a time.
I am very pleased with the overall build quality of this SAT 22 clone, and so I have zero complaints about its quality. However, as I sat with the SAT 22 last night having my last tasting session before I started to pen this review, my feelings are that it does not have the classic crisp, clean, and clear flavor production of a Genesis atomizer in my opinion. The flavor production of a good Genesis is usually “in your face” and very clean. For me it is almost like tasting the juice from the bottle, but the SAT is not like that. I found the flavor to be muddled, and unclear.
I have the same e-liquid in the SAT that I do in the GP Heron clone at the moment, and the GP Heron is far and away better on flavor, which really shouldn’t be for any Genesis atomizer which is usually known for its superior flavor production. I have spoken to a few SAT 22 lovers, and what they all have in common is that they use their SAT 22 with cotton. Perhaps this is one Genesis style atomizer that was meant to break the SS mesh rule?
The good news, the SAT 22 looks great with just about everything.
OVERALL
The first time that I saw the SAT 22 I confess that I didn’t quite understand it. I do like the aesthetic style of the SAT, although even that took a few months to grow on me. The SAT22 from Yosen is a well made, good quality Genesis style atomizer, but there is something missing for me in its actual performance. While I am pleased with its looks, the actual vape misses the mark with regards to both the flavor and throat hit in my opinion. But as I previously said, this atomizer does score high marks with most users that I have spoken to, so perhaps cotton is the magic ingredient?
PROS
CONS
[box type=”shadow” align=”aligncenter” width=”600″ ]
Where to Buy a SAT 22 Clone
- Buy from $9.59 and up – Multiple colors, ships from China
- Buy for $14.51 – Ships from USA
- Buy for $18.95 – Free shipping from USA
[/box]
I have the Fasttech version. Terrible finish on the plastic section but it doesn’t leak and is my genny of choice however, I feel the wick holes are too small leading to a very thin mesh wick. A better solution is to use an untreated piece of mesh as the wick, put a 3mm ekwool sleeve on top and wrap your coil. Shorting issues just don’t happen and ekowool holds more juice so you don’t get dry hits. I have a Kraken, RSST, AGA T3 and the Sat 22 has the best flavor.
Hi Rick .. yes, someone suggested to me to use SS cable with the XC116 sleeve over the top, and sys that his flavor is great. I have both XC116 and ekowool, and I am very familiar with this wick style. I prefer straight mesh in Genesis styles. My first two rebuildable atomizers were Gennies (UD AGI and Kraken), so I have been using them for a long time. My favorite Genesis is still the Kraken. Thank you so much for your comments and suggestions, and I will give either a XC116 or ekowool sleeve a go eventually to see if changes the experience for me. :)