
Pegacorn? Unisus? I’m not sure what the heck is going on with the logo. What I do know is this box mod is rocking dual 18650 cells and kicks out a purported 50W and features a touch sensor. Are these features grounded in reality or mythology? Let’s find out.
The Unicorn 50W box mod reviewed was provided by Electhinker.
[box type=”shadow” align=”aligncenter” width=”600″ ]
Where to buy the Unicorn 50W:
- Buy for $47.24 – Same version reviewed, Free shipping from China
- Buy for $51.62+ – Free Shipping from China
[/box]
A Mythical Creature
Unicorns are cool. Pegasuses?… Pegusii?… what the heck is the plural of Pegasus? Anyway, this box is rocking a winged, horned horse. That’s pretty cool, right? Right. The subject of this review is a dual 18650, variable wattage, 50W box mod featuring a touch sensor (more on that later). Graphics and mythology aside, let’s take a closer look at the Unicorn.
The Packaging and Included Stuff
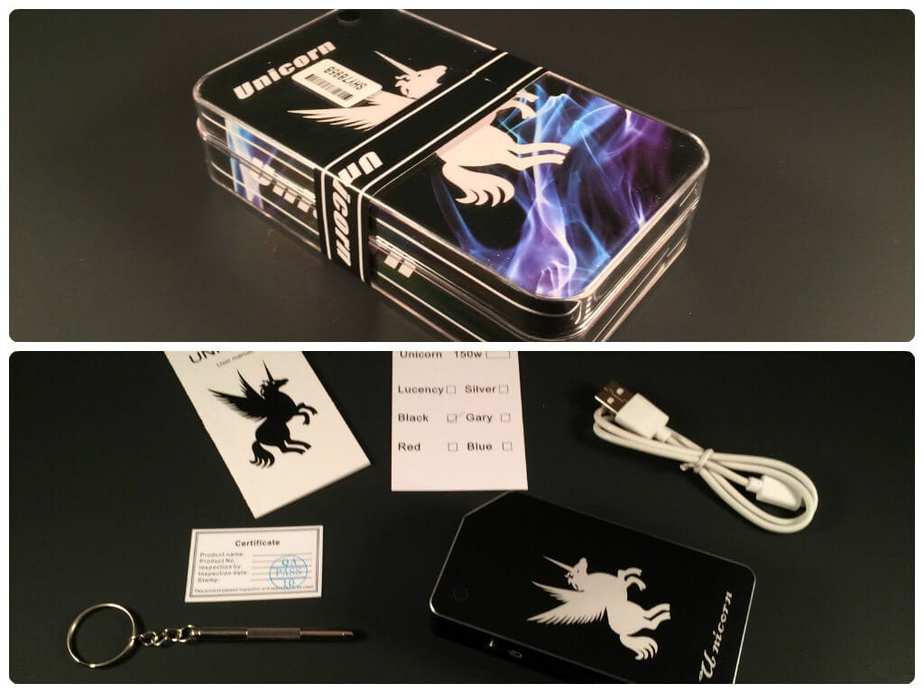
The Unicorn mod arrives in a plastic clam shell box with some snazzy branding. The stuff includes a user manual, a USB charging cable, a dual-headed screwdriver, and the vaunted certificate of quality assurance. Boom!
(click to enlarge)
Unicorn Box Mod features:
- That logo, right?
- Dual 18650 batteries in parallel configuration
- Touch sensor
- Lightweight aluminum body
- Battery ribbon
- Size :106*56.6*24mm
- Adjustable output voltage: 3.6 v- 8.5 v
- Output Power: 7w-50 w
- Input Voltage: 3.2v-4.5v
- Atomizer Resistance: 0.3 – 3.0 Ω
Build Quality
The Unicorn box mod is inexpensive… and it feels inexpensive. Although this box mod checks in at >$50, it does have some redeeming build qualities. The Unicorn is rocking a magnetic battery door, an OLED screen, a lightweight aluminum body, and an adjustable 510 connector. To quote a vaping luminary: “not too shabby”.
However, not everything is magical about the Unicorn’s overall construction. While the buttons are responsive and have a nice tactile “click”, they exhibit a lot of rattle. The battery door slides down rather lifting off of the device, as indicated by the helpful down arrow graphic. Be advised, setting the Unicorn down on a metal surface will likely result in the battery door being left behind when you subsequently pick the device back up. In all other situations, the battery door is quite secure and slides on and off very smoothly.
The 510 connector on the top of the device is adjustable using a small flat head screwdriver – raise the 510 pin by turning it counter-clockwise, lower it by turning it clockwise. The top of the connector housing sits nearly flush with the top of the mod. The front of the device features a firing button above the OLED screen; the wattage up and down buttons below. On the bottom of the mod you will find the USB connector and 18 vent holes. The batteries in the Unicorn may be charged by connecting the supplied USB cable to the device and an appropriate power source. The back of the device, below the touch sensor, has some sort of soft plastic material inlaid into the chassis.
In hand, the Unicorn is a bit ungainly due to its dual battery form factor. Additionally, the edges of the Unicorn’s shell are rather sharp, rendering the device not terribly comfortable to handle for extended vaping sessions. The touch sensor, however, is very conveniently located. It feels very natural to fire the device via the touch sensor using my index finger (again, more on the touch sensor later).
The inside of the Unicorn is a tidy looking affair. The battery tray features labels indicating the proper battery orientation (positive side towards the 510 connector for both cells). Note the strategically placed holographic stickers – these stickers conveniently cover improperly stamped battery polarity markings. Either the plastic surround was intended for another device which uses batteries in series rather than parallel or it was just a manufacturing snafu. If not for the stickers, the potential confusion regarding battery orientation could have led to the premature demise of the mod. It should be noted the inside of the battery door also depicts the correct battery orientation. The battery contacts are fixed on the negative side and have some play on the positive side, allowing the fitment of various 18650 cells (I did not try button top batteries but all of the flat tops I tried fit with no issues). Also found inside the device is a “handy” battery removal ribbon. Handy is in quotes because A) it’s too short and B) it separated from the device the second time I attempted to remove the batteries. Not awesome.

(click to enlarge)
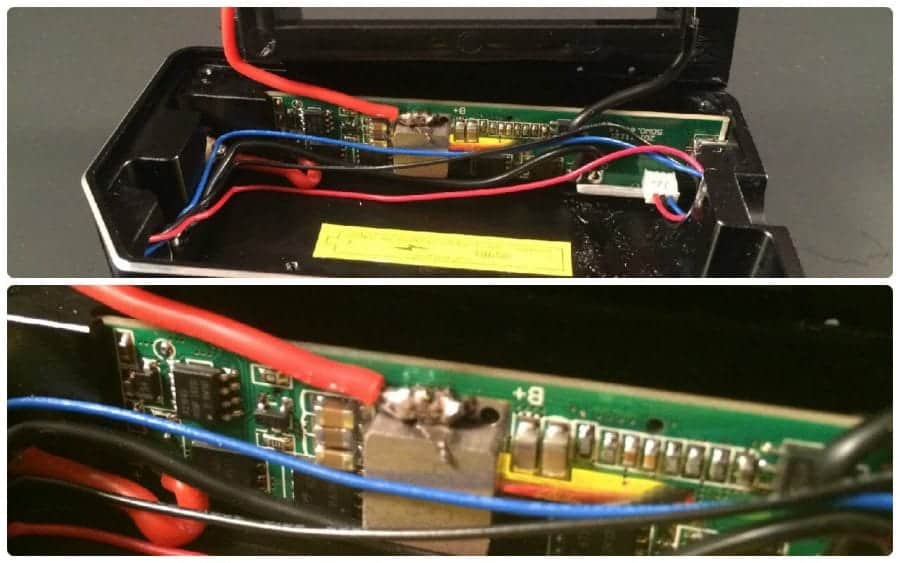
I hadn’t intended to find out what lurks beneath the plastic surround piece inside the device. But, hey, for you folks? Let’s see what’s going on under the Unicorn’s hood.
(click to enlarge)
I was expecting a mess of hot glue – so, the lack thereof was a pleasant surprise. However, the wiring is composed of some pretty small gauge stuff and some of the solder connections are, well, messy. All in all though, the guts of the Unicorn are fairly clean and well done. How well they survive over time remains to be seen.
Riding the Unicorn
Now that we’ve given the Unicorn a thorough physical examination, let’s take a look at the function and performance aspects.
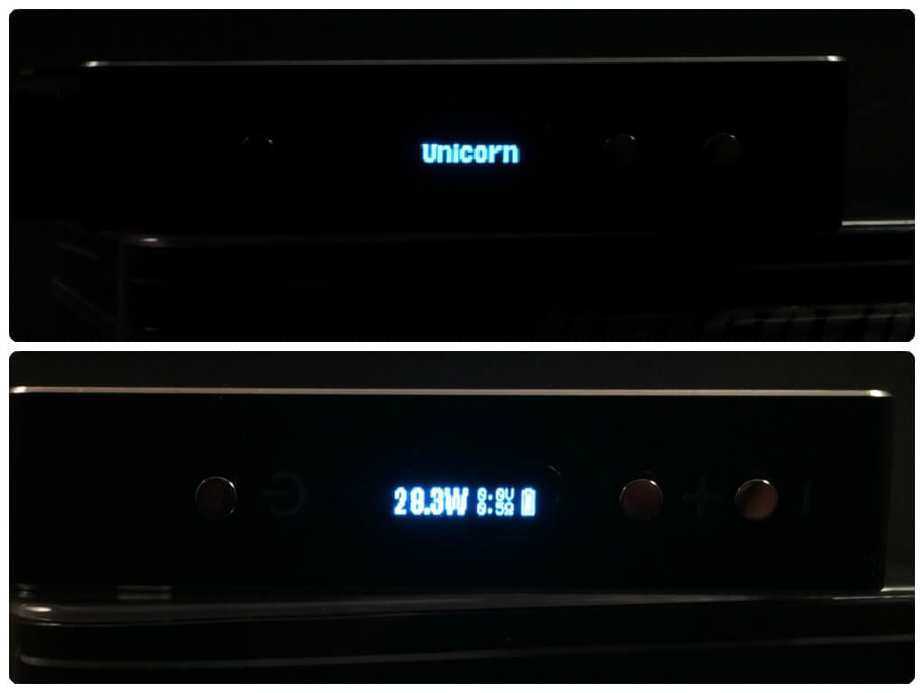
Function first – after inserting a matched pair of high drain 18650 batteries, the Unicorn is brought to life with five properly timed successive clicks of the fire button. Upon successful completion of the button presses, you are greeted by the OLED screen displaying “Unicorn”… lest you confuse this winged beast with another mod, I guess. Clicking the fire button five more times in succession will power off the device.
The Unicorn, like many devices which use a DNA-style display format, shows the current power setting, battery life indicator, atomizer resistance to the resolution of 0.1Ω, and output voltage while firing. Please excuse the dubious quality of the following pictures – capturing the display with my iPhone was, um, challenging.
Adjusting to the desired wattage is accomplished, surprisingly enough, by pressing either the up or down buttons. Each single click will adjust the wattage in 0.1W increments. Holding down either button will continuously adjust the power level in whichever direction you have chosen. The Unicorn will accelerate the adjustment rate after passing 0.7W in either direction. Wattage does not “round robin” after reaching the minimum or maximum setting.
Pressing and holding the fire button and + (up) button will turn the touch sensor on. Subsequently, pressing and holding the fire button and – (down) button will turn the touch sensor off. Pressing and holding the + and – buttons will lock or unlock the Unicorn.
Okay, so how does the Unicorn perform? Actually, quite well. For the purposes of this review I used an Eleaf Lemo built to 0.6Ω – according to my pretty darn accurate ohm meter. The Unicorn reads the atomizer resistance at 0.5Ω. So, pretty accurate.
The Unicorn outputs voltage very accurately. It steps down the voltage and maintains a variance of around 0.2V according to my inline voltmeter. I was really (pleasantly) surprised at the accuracy of the board used in the Unicorn. From lower power all the way up to 50W, the Unicorn was playing no tricks – it really is putting out the power it says it is putting out. A lot of variable power mods on the market today can’t say the same.
I’ve been using the Unicorn for a couple of weeks now and have absolutely no complaints about the consistency and performance. I’ve experienced no odd behaviors, no glitches, no bugs… nothing but rock solid, predictable performance. Battery life is exceptional with two 18650 cells. On a related note, the Unicorn drains both cells at nearly identical rates. Pulling the batteries out and measuring their voltage periodically resulted in almost identical drain every time. At most, there existed a 0.1V difference between the batteries. Pretty dang good.
Remember the touch sensor? Yeah, maybe you should forget it. The only real issue I experienced using the Unicorn was the propensity for the device to auto-fire when the touch sensor was enabled. I ran into this problem not long after starting the test of the Unicorn. I quickly disabled the touch sensor and never re-enabled the feature. To be fair, I experienced a similar issue with my old Pioneer 4 You IPV2’s touch sensor. It really is a shame because the Unicorn’s touch sensor is perfectly positioned on the device. I’d suggest to the manufacturer to ditch the touch sensor and move the fire button to the sensor’s current location.
All things considered, the Unicorn is a very good performer.
Conclusion
The Unicorn, while fairly cheaply constructed, is a surprisingly good performer. I can overlook the build quality and ergonomic deficiencies in light of how consistently and accurately it powers an atomizer. Will it endure a long, chain vaping life? Hard to say… but, judging by the overall build quality, I’d opine this device is destined to be a throwaway mod at some point in the not too distant future. But, given the price point and how quickly new devices are coming to market, I think the Unicorn is a lot of bang for the buck – I’ve used worse devices which cost more money. I have no problem recommending the Unicorn to a vaper looking for a moderately powered, accurate device which delivers all day battery power.

PROS
CONS
[box type=”shadow” align=”aligncenter” width=”600″ ]
Where to buy the Unicorn 50W:
- Buy for $47.24 – Same version reviewed, Free shipping from China
- Buy for $51.62+ – Free Shipping from China
[/box]
This thing screams P4U through and through , the packaging , the plastic case it comes in, the shape (ala iPV III), the touch sensor , the button layout and screen and the useless triangular shaped design on the opposite side of the function buttons , although it’s an oblong design on some of the iPV’s.
I appreciate the straight forward review style you show here , not afraid to call out the bad unlike so many other review people these days
Many worry more about not offending the manufacturer who provided the mod for review instead of just telling it like it is and really being helpful .
I found your comment about the somewhat flimsy feel of the device interesting , i would think aluminum would be a solid tough enclosure but if you make it too thin as some manufacturers do it deserves to be pointed out .
Well done Sir.
Thanks for your comments, Chris. I try to be as objective as possible with my reviews. I have no skin in the game other than trying to help folks figure out if a particular product is right for them.
I definitely have no qualms with identifying deficiencies… see my Xedis TriTank review, lol.
I got mine from Fastech and honestly, the case seems pretty substantial. My only complaint about the chassis is that the magnet on the door doesn’t hold it a little more solidly – which I am assuming is due to the magnet not sitting flush. That, and that it frequently picks up coils or bits of cut off kanthal. Not a big deal – it is just kind of annoying.
My big complaint about this device, is how I quite nearly burnt mine up. I had a single coil of 2 strand twisted 24g kanthal, six wraps at 2.5mm. I was firing it (46w) without a wick to tighten the coil and it wouldn’t cut off when I released the button. Instead it appeared to be increasing the heat of the coil, and smoke started pouring out the bottom. I pulled the batteries immediately, which weren’t even hot, to shut it down.
It still seems to work, but the hot wire from the board to the 510 connector sustained substantial damage. The mod now has a tendency to shut down randomly. I swapped out the damaged wire, but that has not fixed that problem. It also has that lovely burnt electronics odor going on, but that is finally fading.
Don’t get me wrong, this thing is pretty awesome in certain ways. I love that the batteries drain pretty evenly. And I noted the accuracy it reads at as well. But I really don’t think the electronics are susbtantial enough for firing at much more than 40w.
As soon as I can find a source for a YiHi SX330 V4, I think I will put one into this box. It should fit perfectly, and I won’t use insubstantial wiring. I would prefer to use the SX350J, but that wouldn’t fit quite right and the only difference of any use to me is that the USB connector aims to the side of the device, rather than the bottom – which of course is why it wouldn’t fit this box. I certainly don’t need to additional power.
Thanks very much for your input! What was your coil resistance? In the neighborhood of .25ohm? 46W with a .25ohm atomizer resistance generates ~13.5A of current output from the board. According to Fasttech, the board’s max current output is 10A – even though the board is claimed to be able to fire .1ohm resistance atomizers. Probably something I should have investigated in greater detail for my review.
Sounds like you simply asked too much of the board and wiring. A 10A output current max is kind of silly for a mod able to fire super low resistances. The wiring (and probably the board’s circuitry) just aren’t up to outputting that kind of amperage.
Hah! That is probably the problem! I didn’t even note that and should have. It really doesn’t make any sense to fire at .1, when it can’t handle <10A output. I don't think it is the board, I think it is the wiring. Though given that it keeps shutting down at random, it may have killed the board too. I'm going to experiment with it a bit, once I put a new board in the case – stress test the board with heavier wiring.
The coil resistance was .27ohm.
You can turn the touch sensor on my holding the plus and the power button for about 3 seconds